SAP SuccessFactors - How do I set up my connection with specific permissions for an HRIS integration?
Last updated: December 1, 2025
Overview
This article covers the steps needed to generate credentials in your SAP SuccessFactors instance. These credentials can be scoped to only specific fields and employees by following the steps below.
Prerequisites
Please ensure you fulfill all the requirements to set up the integration:
You have Administrator permissions in your company's SAP SuccessFactors instance
Instructions
Step 1: Create a new user that will be used to link
Search for and select the Import Employee Data task
Update the action to Download Template

Select an entity of Basic Import and click Generate Template

Open the downloaded file and add a row with the below information

Field
Sample value
Notes
Status
active
User ID
integration_sample
This should be anything that will help you remember the user/integration
Username
integration_sample
This should be anything that will help you remember the user/integration
First Name
Sample
This should be anything that will help you remember the user/integration
Last Name
Integration
This should be anything that will help you remember the user/integration
Email
Doesn't need to be valid
Manager
NO_MANAGER
HR
NO_HR
Default Locale
en_US
After configuring and saving the file, go back to SAP and update the action to Import Data

Choose and entity of Basic Import, select your file, then click Import
Note, you can validate your file first by selecting Validate Import File Data

Confirm the success dialog appears

After a few seconds to a minute, search for the user you've created. If the user appears, you've successfully created the user.
Step 2: Create a new Permission Group for the user
Search Manage Permission Groups in your search bar to navigate to the Permission Groups page.

Click Create New to begin creating a new Permission Group for linking.
Choose a name you'll remember that will help track that this Permission Group is for this specific connection.
The User Type needs to be Employee, and the Choose Group Members should include the User you created in Step 1.
You do not need to input anything in regards to the Exclude Section, or the Granted Permission Roles at this time.
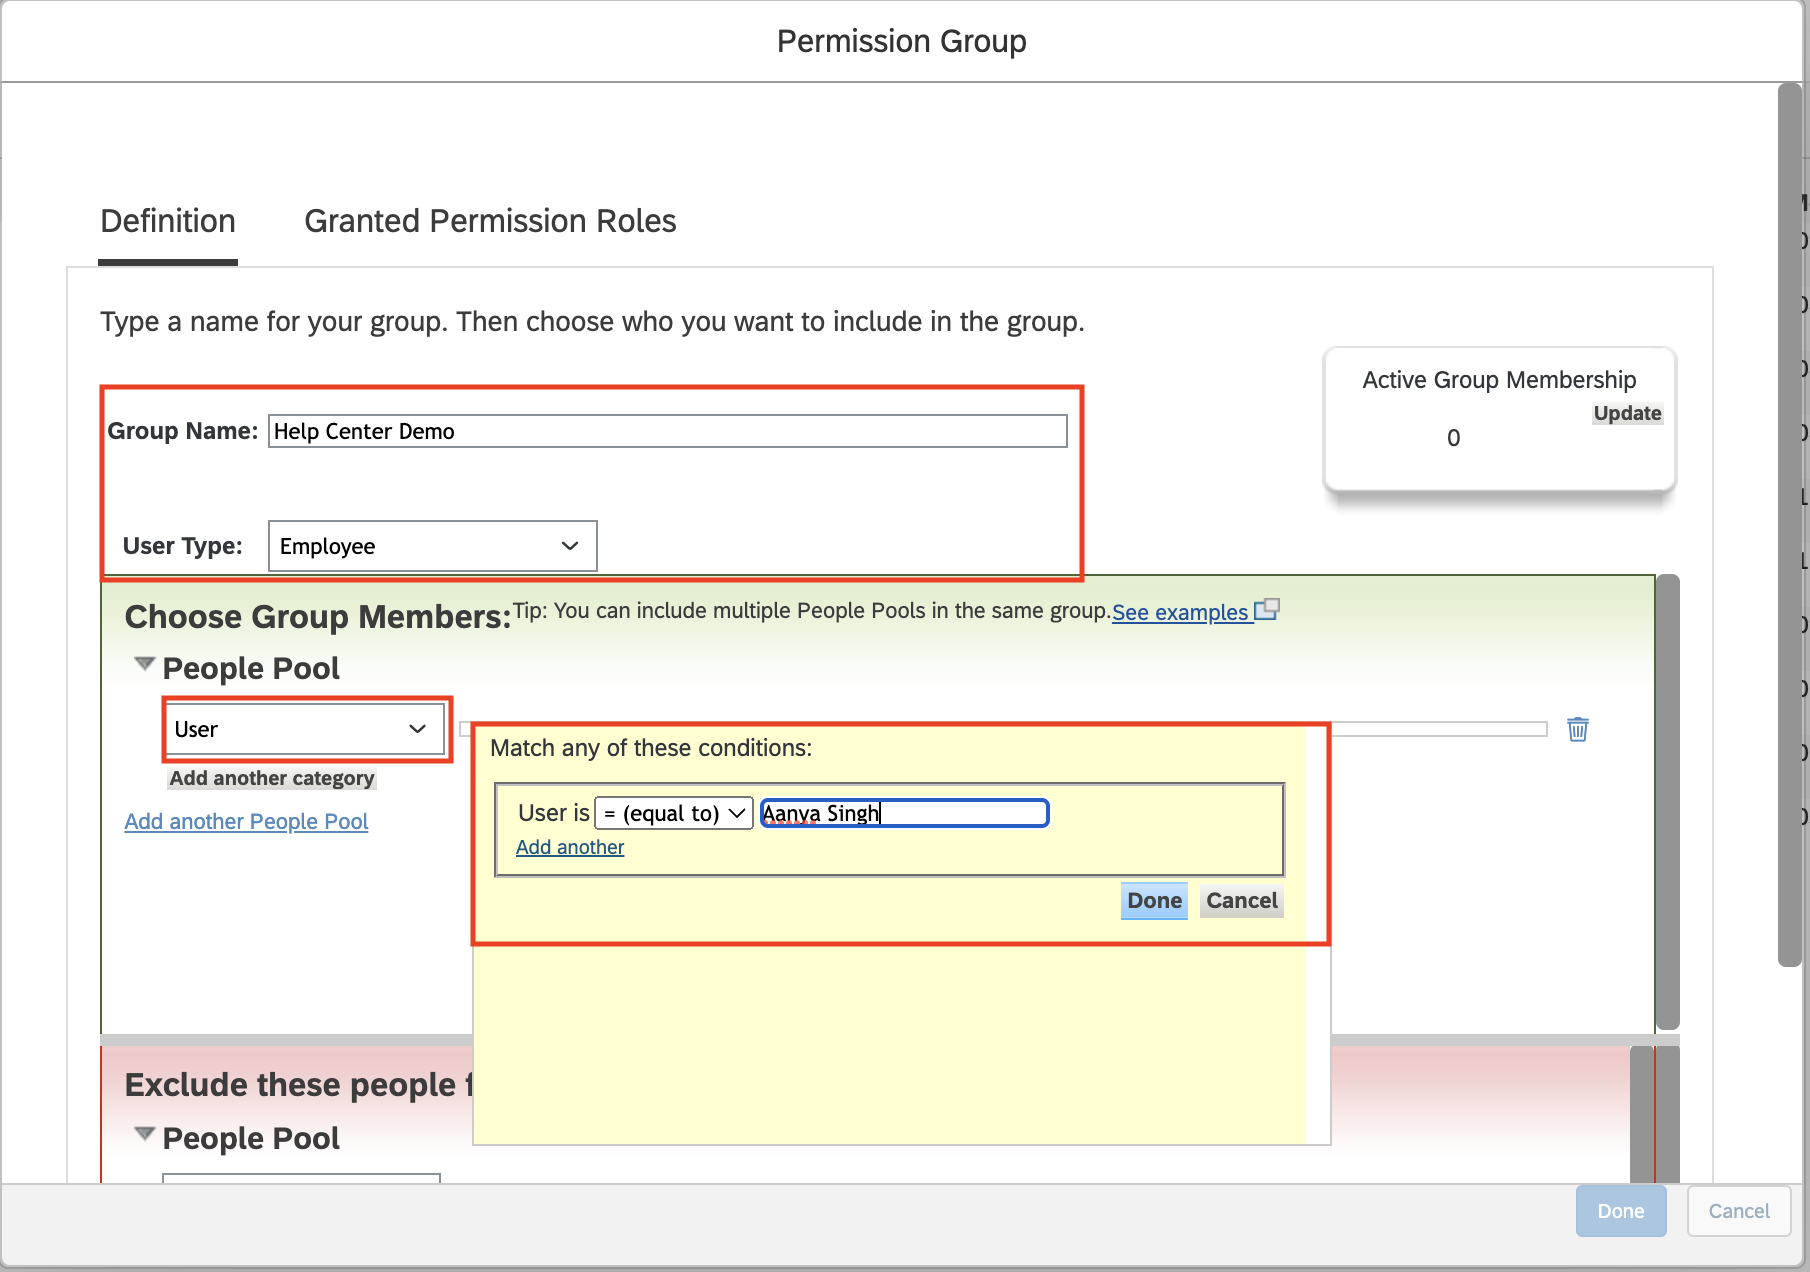
Click Done to create and save this Permission Group.
Step 3: (Optional) create a Permissions Group for the "target" employees
If you want to only provide access to certain employees (employees within a given company, non-contingent workers, etc) and don't already have a Permissions Group for the target audience, follow the steps in this section.
Click Create New to begin creating a new Permission Group for the target audience
Give the group a name like "<integration name> target audience"
Apply the filters:
The example below provides access to employees in the "Atlanta"
Note, you can test the filters by clicking Update, then selecting the Active Group Membership number

Once done specifying the filters, click Done
Step 4: Create Permission Role with proper permissions
Search up Manage Permission Roles in your search bar to navigate to the Permission Role page.

Begin creating a new Permissions Role by selecting Create
Configure the name of the Group, then click Next
Choose a name you'll remember that will help track that this specific connection.

Identify and select the permissions that matter for the use case you are trying to achieve. Details below:
Employee Central Effective Dated Entities > Personal Information
Note you can select all by clicking View Current at the top of the grid. Doing so will auto-select all the below fields.
Permission
Access
Notes
Personal Information Actions
View Current
Required for employee name and/or demographic data
Gives access to the PerPersonal entity
First Name
View Current
Middle Name
View Current
Last Name
View Current
Preferred Name
View Current
Gender
View Current
Marital Status
View Current
Nationality
View Current
Any custom fields or other fields you have/want to provide access to
View Current
Employee Central Effective Dated Entities > Addresses
Permission
Access
Notes
Address Information Actions
View Current
Required for Employee address data
Employee Central Effective Dated Entities > Job Information
If you want to pull an Employee's job/position, we suggest selecting all by clicking View History at the top of the grid. Doing so will auto-select all the below fields.
Permission
Access
Notes
Job Information Actions
View History
Required for employment data (job and/or pay)
Gives access to the EmpJob entity
Position
View History
Position Entry Date
View History
Company
View History
Business Unit
View History
Division
View History
Department
View History
Location
View History
Cost Center
View History
Supervisor
View History
Job Classification
View History
Job Title
View History
Regular/Temporary
View History
FTE
View History
Employee Type
View History
Employee Class
View History
Employment Type
View History
jobInfo_seq-number
View History
jobInfo_event-reason
View History
Any custom fields or other fields you have/want to provide access to
View History
Employee Central Effective Dated Entities > Compensation Information
If you want to pull an Employee's pay, we suggest selecting all by clicking View History at the top of the grid. Doing so will auto-select all the below fields.
Permission
Access
Notes
Compensation Information Actions
View History
Required for employment data (pay only)
Gives access to the EmpCompensation entity
Pay Group
View History
Current Salary
View History
New Salary
View History
compInfo_event-reason
View History
Any custom fields or other fields you have/want to provide access to
View History
General User Permission
User Search
Minimum required permission for all use cases
Gives access to User entity
Employee Data > HR Information
Note you can select all by clicking View Current at the top of the grid. Doing so will auto-select all the below fields.
Permission
Access
Notes
Biographical Information
View
Minimum required permission for all use cases
Gives access to the PerPerson entity
Phone Information
View
Required for employee phone data
Email Information
View
Required for employee email data
Business Email Address
View
Required for employee email data
Business Address
Any custom fields or other fields you have/want to provide access to
View
Employee Data > Employment Details
Note you can select all by clicking View Current at the top of the grid. Doing so will auto-select all the below fields.
Permission
Access
Notes
Employment Details MSS
View
Required for any employee use case
Gives access to the EmpEmployment entity
Hire Date
View
Required for any employee use case
Termination Date
View
Required for any employee use case
Original Start Date
View
Any custom fields or other fields you have/want to provide access to
View
Payroll Integration Permissions
Permission
Access
Notes
Employee Payroll Run Results
View History
Required for employee payroll result data
Employee Payroll Run Results.employeePayrollRunResultsItems
View Current
Required for employee payroll result data
Miscellaneous Permissions
Permission
Access
Notes
Payment Information
View History
Required for employee bank information data
Payment Information .Details
View Current
Required for employee bank information data
Employee Central API
Employee Central Foundation (read-only)
Minimum required permission for all use cases
Gives access to Company-related data
Manage System Properties
Picklist Management and Picklists Mappings Set Up
Minimum required permission for all use cases
Gives access to view the labels for fields like employment status
After setting the permissions, click Next in the bottom right
Review the permissions one more time, then click Save
A pop up will appear asking if you want to continue to assign the role. Click Yes

You'll be taken to a Role Assignment screen. In the Basic Information tab make sure the below is populated, then select Next.
Name: can leave as is
Target Population User Type: Employee
Status: Active

In the Grant Access To tab, grant access to the User you imported in Step 1 by selecting the Permissions Groups you created in Step 2, then click Next.

You'll be taken to the Define a Target Population tab. IMPORTANT, please read the below:
If you want to grant access to all users & employees:
Select Everyone
If you want to only grant access to specific employee:
Select Filtered By
Choose Permission Group
Select the Permissions Group for the target employees that you created in Step 3

Select Next to proceed to Define Data Blocking
Note, depending on your selected permissions, you might not have a Data Blocking step
Leave the default Data Blocking selected and select Next to proceed to the Preview
Review your setup, then select Save
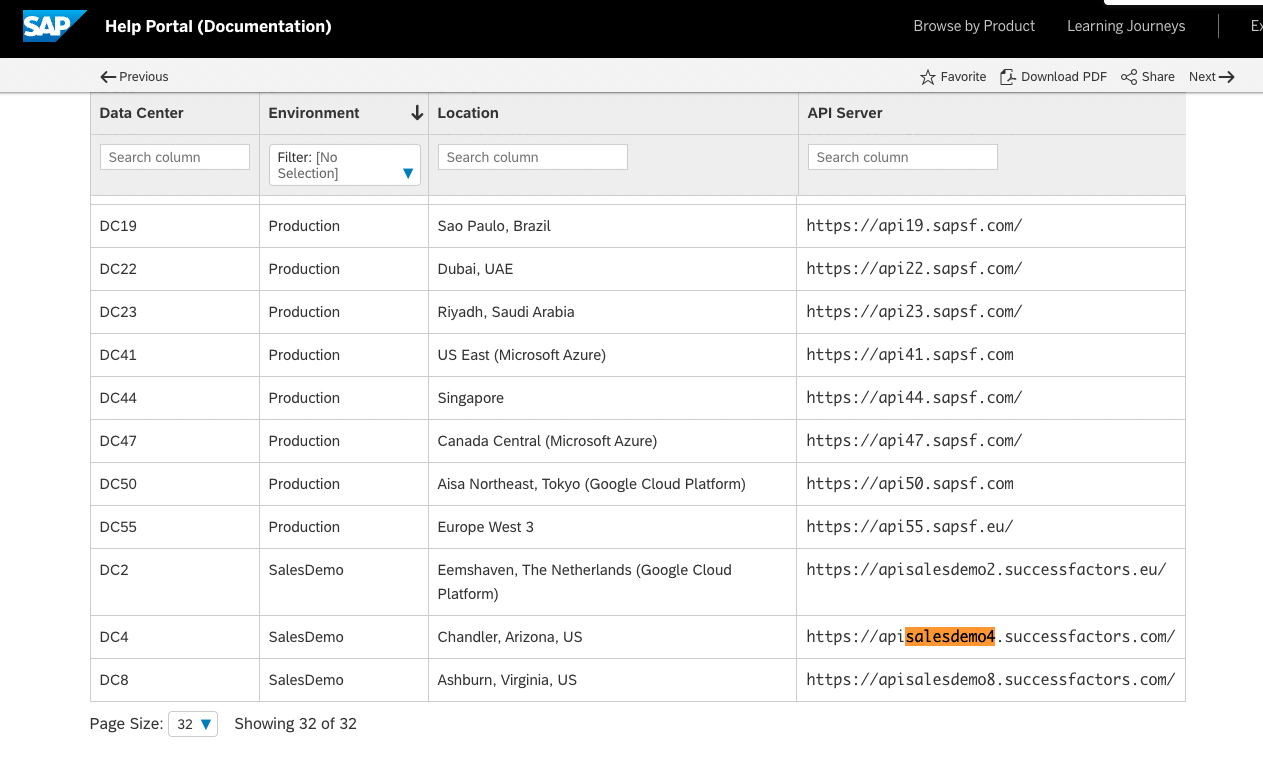
Step 5: Find your SAP SuccessFactors API server URL
To find your API Server URL, navigate to the list of SAP SuccessFactors API Servers
In the listed API Server URLs, search for the environment that matches your subdomain.
For example, if your domain was https://salesdemo4.successfactors.com, search for salesdemo4.
If you are unsure what your API Server URL is, or are having trouble connecting, we recommend reaching out to your SAP Support team to obtain your API Server URL.
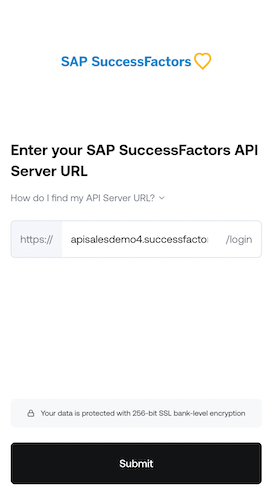
Once you've found the URL, copy the entire URL.
In this example, it would be:
apisalesdemo4.successfactors.com
Enter your SAP SuccessFactors API Server URL into the integration authorization component as shown below:
Step 6: Input the username and company ID in the linking flow
In the linking flow, input the username of the User you created in Step 1

If you don't know your company ID, select your profile image in the top right, then select Show version information.

Your Company ID will appears in the pop up - sample below

Once you obtain your company ID, enter it in the linking flow as shown, then select Next

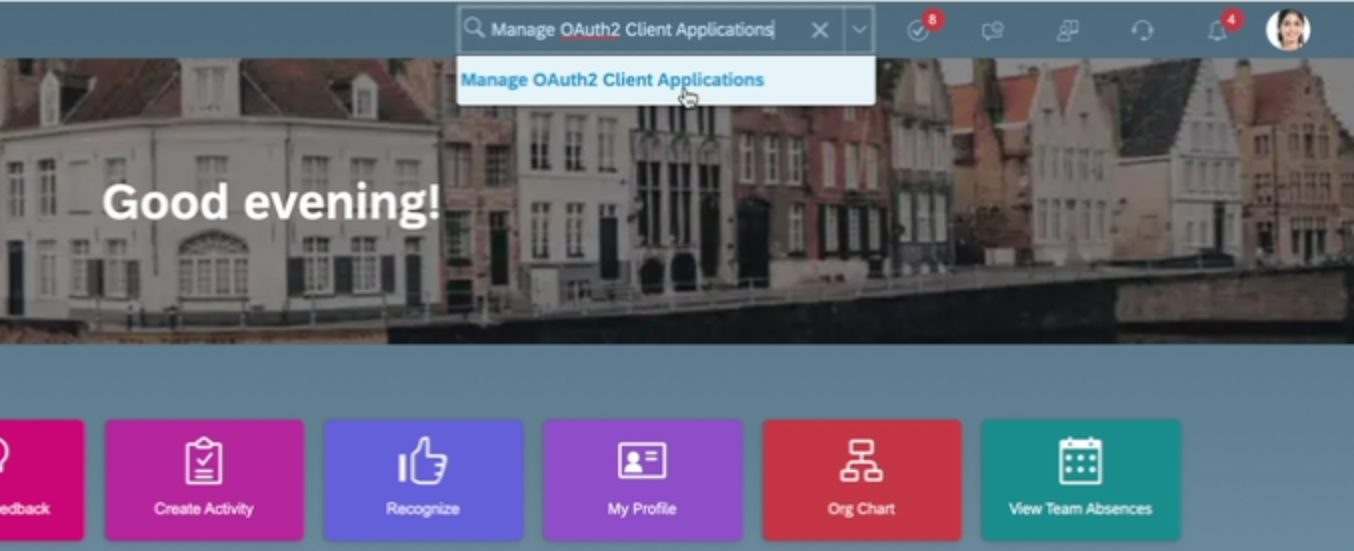
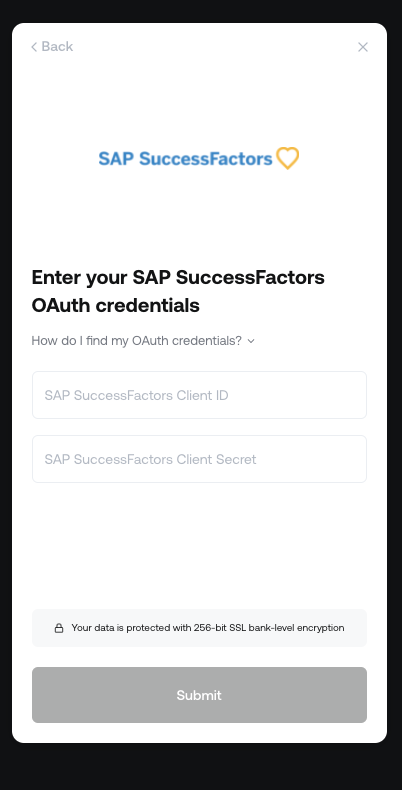
Step 7: Generate your SAP SuccessFactors Client ID and Secret
In your Admin Center, go to Tools, and search Manage OAuth2 Client Applications (If your page looks different, search for Manage OAuth2Client Applications in the search tool on your homepage).
Click Register Client Application.
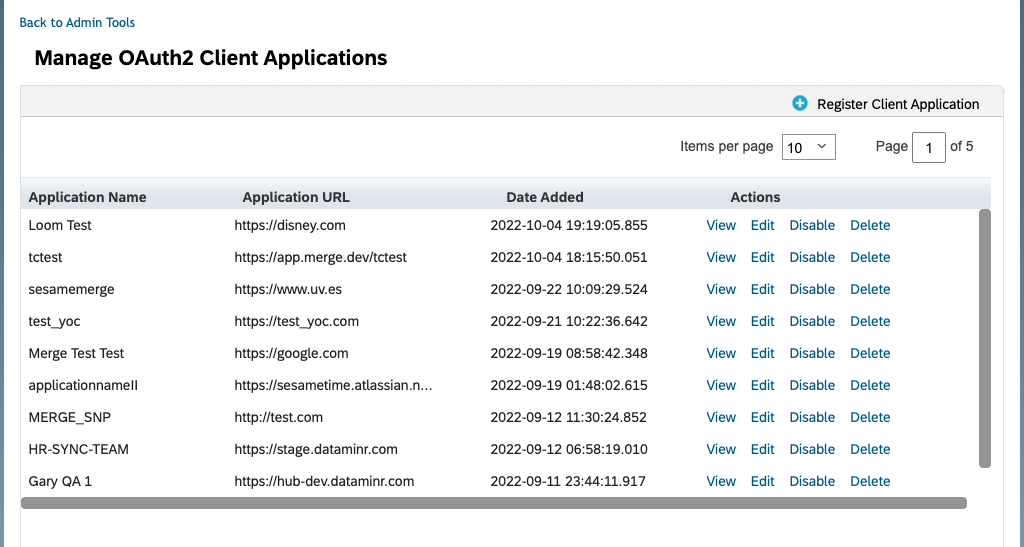
Fill out your application details:
Application Name & Application URL (what actually goes in these fields is not important, except that the URL has to begin with https://).
Check Bind to Users
Input the username of the user you created in step 1 in the User IDs field

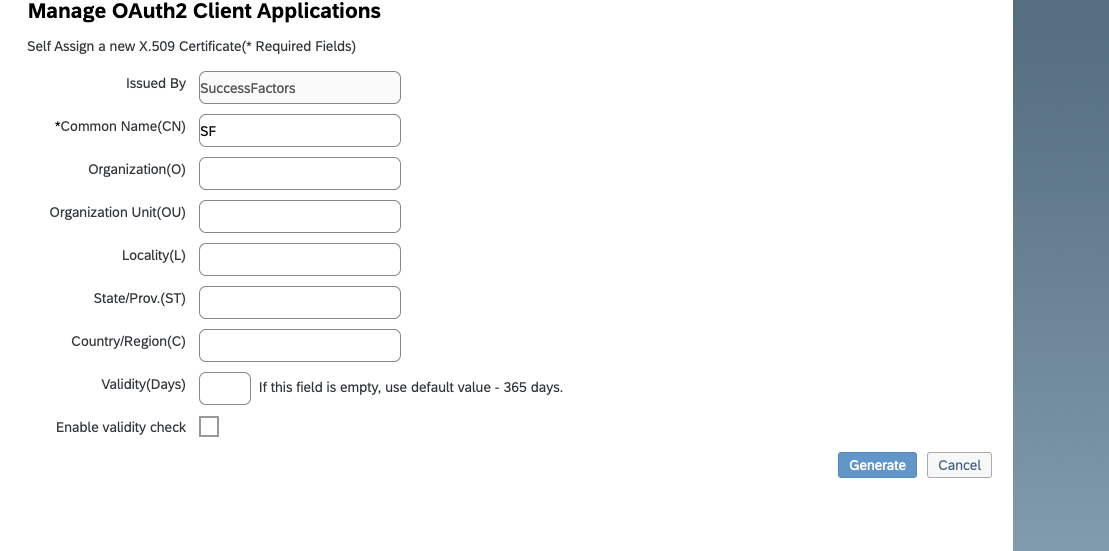
Click Generate X.509 Certificate. Fill out Common Name (name doesn't matter) and hit Generate.
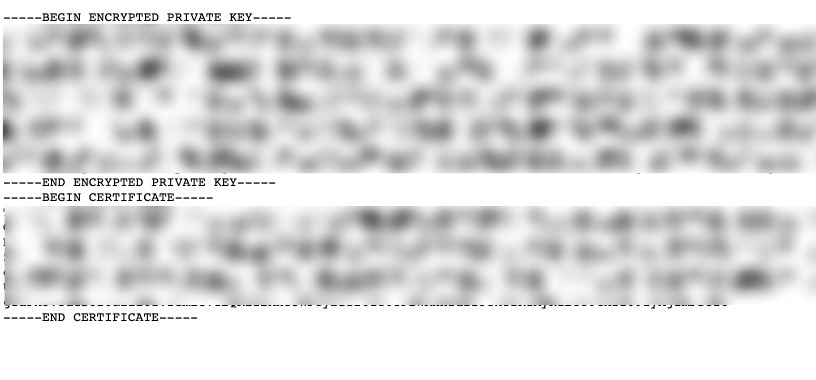
Once the certificate populates, download and save it. You will have downloaded a file called Certificate.pem.

Click Register (it will have replaced the Generate button).
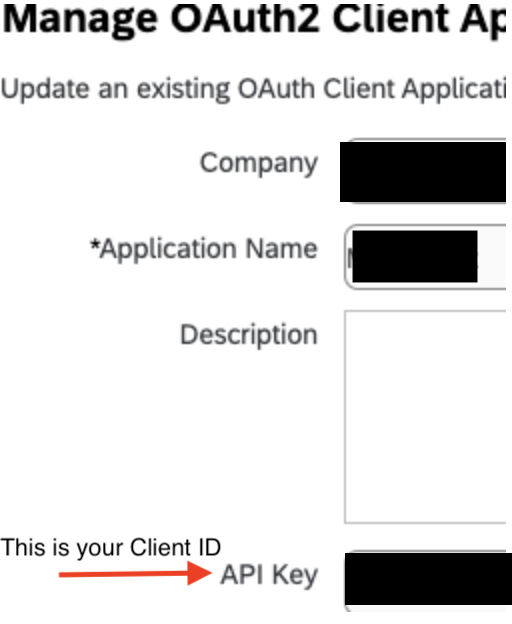
Back on your Manage OAuth2 Client Applications, go to the application you just created and click Edit.

You will now see an API key listed - this is your Client ID. Copy and save this Key.
Open up the "Certificate.pem" file that you downloaded previously in a text editor. The string between ——BEGIN ENCRYPTED PRIVATE KEY——- and —-END ENCRYPTED PRIVATE KEY——- is your Client Secret. Copy the Client Secret and save.
Enter your Client ID and Secret into the integration authorization component as shown below:
The linking flow should now attempt to validate your credentials. This can take a few seconds to about a minute. If you've done everything correctly, you should then see a success screen, then you're done!