UKG Ready - How do I link my account?
Last updated: July 8, 2026
Overview
To authenticate your UKG Ready account, you will need to provide the following information:
Domain
Company Short Name
API Key
Service Account User ID
Service Account Password
This guide will walk you through finding or creating those credentials within UKG Ready.
Prerequisites
Please ensure you fulfill all the requirements to set up the integration:
You are an Administrator in your company's UKG Ready instance, or someone has shared their access with you.
Instructions
Step 1: Enter your Domain in the linking flow
For example, if you sign in at "acme.com/ta/Default.login", enter "acme.com"

Step 2: Find your Company Short Name
Log into your UKG Ready account and open the menu in the upper left. Then, go to your settings icon and click on Global Setup, followed by Company Setup

Open Company Info

Scroll down to find Company Short Name under Company Address. Copy your Company Short Name

Paste your Company Short Name in the linking flow and click Submit

Step 3: Find your API Key
In your Company Setup page, go to Login Config

Scroll to find API Keys and click the eye icon to reveal the key. Copy the API Key and store it in a secure place
If there is no key, you can click GENERATE to create one. If there are existing integrations using this key, DO NOT click generate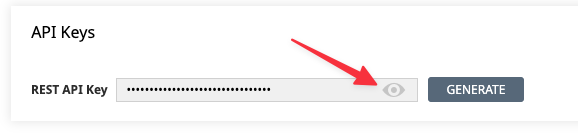
Paste your API Key in the linking flow and press Submit

Step 4: Create a security profile
In your menu on the left, go to Settings, Profiles/Policies, and then Security. Click NEW SECURITY PROFILE on the upper right-hand side


In this profile, we want to ensure all relevant permissions are enabled for the following endpoints.
Note these permissions may be different based on your specific use case.In your HR Tab:
Find Employee Management, Base Compensation (or Base Renumeration depending on locale). Select View from the drop-down menu.
Find Benefit Management (Plans). Select View.
Find Cost Centers. Select View.
Find Total Compensation. Select View.
Find HR Custom Values. Select View.


If you want to provide access to Time Off data:
Under TLM navigate to Time Off Requests and enable the following permissions.

Under Leave of Absence Management near the bottom, select Manage Requests (if applicable)

In your Modules tab (if applicable):
Scroll to Rest API Resources. Select Employee Demographics, Employee HR Custom Fields, Employee Profiles, Employee Pay Information, Employees, Employees (Changed), and Employees (me)

Scroll to Accruals. Select Accrual Balances (2.0) View

In your Global tab (if applicable):
In Global Setup, find Company Country/Legal Divisions, Cost Centre Definitions and Leave of Absence Custom Fields Definitions. Select View for them

In Object Lists, find Company EINs, Cost Centers, Leave of Absence Categories, and Pay Period Profile and select View for all

In your Payroll tab (if applicable):
Find the Payroll section. Click Create/Edit Payroll and View/Edit/Add next to payroll adjustment
Select Payroll Prep Process

Step 5: Create your service account
From Settings > Global Setup > Company Setup, go to Edit Tabs

From the Available Windows box on the right side of the screen, scroll down to Service Accounts. Drag it to the Top section in the middle. Click Save

Click Add Service Account. To create a new account:
Choose a username and password
Choose the the Security Profile you created
Click the magnifying glass for Account Groups and select All Company Employees


Step 6: Add your service account to the linking flow
You're almost there! Now, just type in the User ID and Password of the Service Account you just created to complete the linking flow.
